Zotero WebDav Server
Aug 17, 2026Zotero is a free, easy-to-use tool to help collect, organize, and cite research papers. This is widely used, and really helpful for graduate students / researchers.
What’s nice is Zotero handles syncing of all the articles you collected over the years as well as their attachments (most likely PDFs of the corresponding article) on different machines. The actual metadata of the articles that you saved are stored on the zotero server for free, and to my knowledge, does NOT have a limit. However, there is a limit on the attachment files stored on the Zotero server, i.e. the actual PDFs for the articles. If you’re on the free-plan, the upper limit quota is 300MB. For 2GB storage, you would need \$20 per year, and 6GB for \$60 per year. See pricing here .
If you want to avoid paying any subscription fees, Zotero has an option of using a WebDav server in the setting.
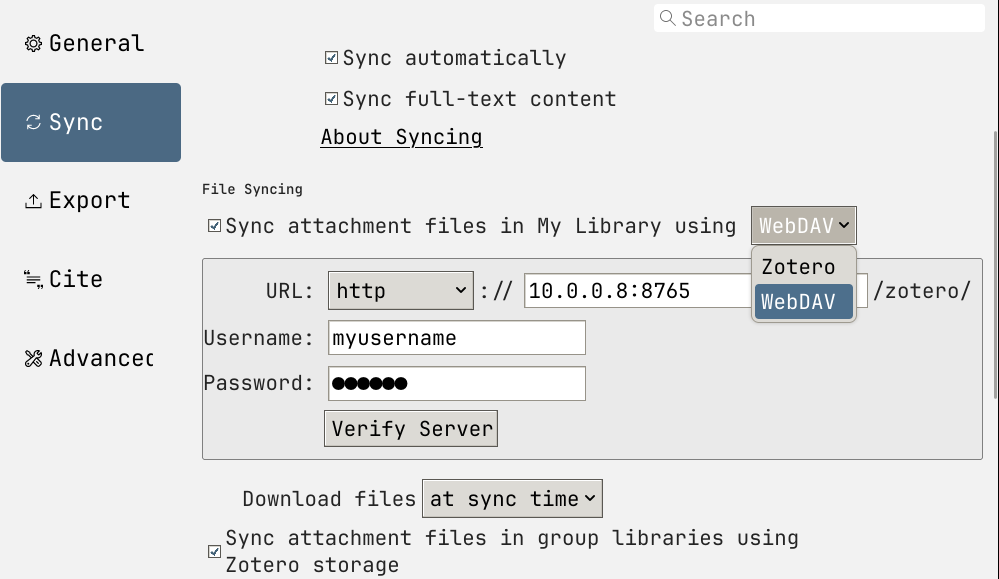
Figure 1: Zotero setting page showing WebDav option
You can use webdav servers from various sources,
and zotero also keeps a sample list on their website .
However, it would be good if we can host our own
simple webdav server locally.
A simple way to accomplish is via rclone,
an open source command-line program that lets you manage and sync
files over different cloud storage services.
But you can also host your own webdav server from your local directory
via command rclone serve webdav command.
WebDav server via rclone
First create a set of username and password that you will be using to access the webdav server. Run
1htpasswd -B -c <path-to-store-username-and-pw> <your-username>
A typical choice for path is /etc/rclone/htpasswd.
Once you have the username and password stored.
We can host the webdav server via
1rclone serve webdav <pathto-zotero-storage> \
2  --addr 0.0.0.0:8080 \
3  --htpasswd <path-to-store-username-and-pw> \
4  --vfs-cache-mode writes
where you put where you want to store the zotero data and
the username and password that you set via htpasswd.
--addr 0.0.0.0:8080 says webdav server listens to all machines on the same LAN,
and its port is 8080. So you now from any machine connected on the same LAN,
you should be able to visit the webdav server in browser via
http://<local-ip-hosting-webdav>:8080. From there, it should prompt you
to enter the username and password. Note that it only hosts a simple webdav
server that does not allow you to upload files from the browser.
But we can now simple put these information in the Zotero setting,
and it should detect the server and will create a /zotero sub-directory there.
Hosting as Docker Container
Now it is likely preferred to host the service via docker as containers.
Once you have docker installed and set upon your machine or home server,
you can easily spin up docker containers via docker compose,
which runs the service as a docker container according to the
docker compose yaml file.
A sample yaml file for hosting webdav server via rclone is
 1# /opt/zotero/docker-compose.yml
 2services:
 3  rclone-webdav:
 4    image: rclone/rclone:latest
 5    container_name: zotero-webdav
 6    restart: unless-stopped
 7    command: >
 8      serve webdav /data
 9      --addr :8080
10      --htpasswd /config/htpasswd
11      --vfs-cache-mode writes
12    volumes:
13      - <path-to-store-zotero>:/data
14      - <path-to-store-username-and-pw>:/config/htpasswd:ro
15    ports:
16      - "<port>:8080"
A good place to organize all different docker containers is in
/opt/, i.e. simply store the above in /opt/zotero/docker-compose.yml.
With the docker compose file in place, to spin up the container, do
1docker compose up -d
In Figure 1 ,
it shows an example where the local machine has local IP of 10.0.0.8,
and I used a port of 8765 for the docker container.
Some notes:
- If you want to put zotero storage on a NAS,
then simply mount the NAS dataset on
the machine hosting the container, something like
/mnt/nas/zotero/and use that as<path-to-store-zotero>. - When hosting the webdav server in a container,
it might also be convenient to create the username and password
in the same directory as the
docker-compose.ymlfile, i.e./opt/zotero/for the case above. - You can choose an arbitrary port to access, under the
portssection.
Accessing outside of LAN
For current setup, we can only access the webdav server when we’re on the same network as the server hosting the webdav server. That being said, we want to be able to access and sync Zotero files when we’re outside of the home network. To resolve this, we can simply use a VPN service which will essentially put the client machine on the same network as home server, which will then give access to the webdav server.
An extremely easy VPN service option is to use tailscale . Essentially create an account on their website, register both the home server hosting different services and your client machines. Doing this, all machines registered under the same network in the account will see each other as if they’re on the same network once they have tailscale up and running.
Another popular self-host alternative is WireGuard . This requires a little more fiddling to set up, but this offers more control over different network settings.